This is the seventh in a series of posts this week on different fitting adjustments you can use for the Clover sewalong, or for nearly any other pair of pants you make. This tutorial is for those who have large calves. If you find your pants binding against your calves, check this out.
Fitting notes:
- After you’ve made your muslin, please refer to the pants fitting cheatsheet to help you decide which adjustments to try.
- Use your muslin to determine how much to adjust the pattern. For example, if you can see that you need an extra inch of width in a certain area, you’ll need to add an inch of width when adjusting your pattern.
- Refer to this post on making muslins for further help with this.
- Be sure to make a second muslin (and perhaps more) after you’ve adjusted your pattern.
How to use the fitting diagrams:
- You will want to trace a copy of your pattern. Not a big deal, since this pattern has only a few pieces, and it will save you from ruining your pattern.
- Mark your seamlines on the pattern (5/8″ from the edge). You don’t need to mark it over the whole pattern, but at least mark the seam at the points where the slash lines are. On the diagrams, the seamlines are marked with dashed lines.
- The diagrams show where to cut, spread, and overlap your pattern.
- You’ll notice little circles in some spots, where the slash lines intersect the seam line. This is called a “pivot point.” Don’t slash the pattern all the way to the edge, but instead slash just to where this circle is. Then carefully snip into the seam allowance, forming a little hinge where the circle is. When you adjust your pattern, you’ll be pivoting at this point rather than from the very edge.
- Once you have your pieces adjusted, tape them into place. You can then retrace the pattern piece if you like.
Further help:
I’d love to help you as much as possible, but please realize there are a lot of you and only one of me. Please be sure to help each other out in the Flickr group as much as you can, and check out the fitting section of our Amazon store for further research.
Adjusting for larger calves

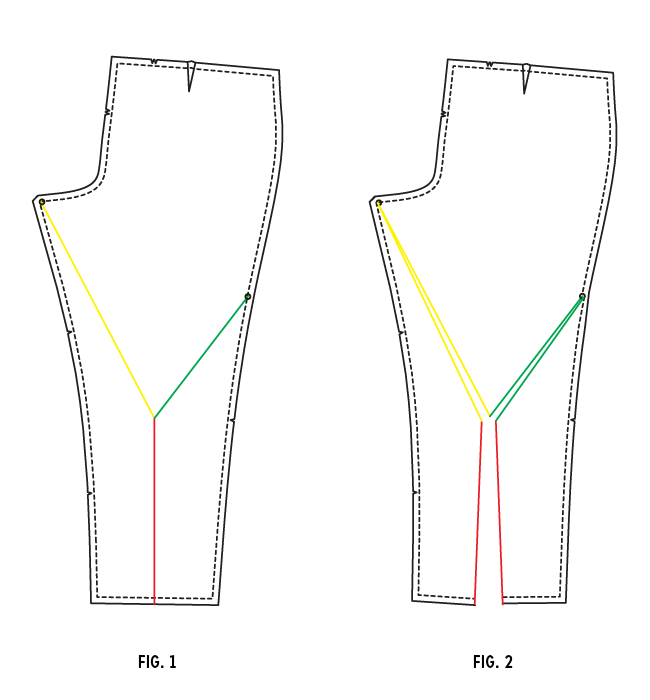
1. Draw in the slash lines on the pattern back, as shown in fig. 1. For this adjustment, you will only need to adjust the back.
2. Cut the pattern along these lines. Note the circles, which indicate where you will pivot the pattern. Cut a hinge here in the seam allowance rather than cutting all the way through to the edge (see notes above).
3. Spread the pattern, as shown in fig. 2. Add the amount of ease needed at the fullest part of the calf.
4. Tape in place and retrace the pattern piece, smoothing out any lines that need it. Redraw the hem if necessary.


Comments
You have no idea how excited I am for large calf adjustment. Luckily, I believe it’s the only adjustment I need to make!
This is one of the kinds of adjustments that are rarely discussed or demonstrated. I have the opposite problem, but this gives me a means of back tracking. I have a belly with skinny legs. Nice to see a very usable and succinct tutorial.