Welcome to the second in a series of posts I have planned for this week all on different fitting adjustments you can use for the Clover sewalong, or for nearly any other pair of pants you make. This one is for those of us with either a prominent abdomen, or a more flat abdomen than a pattern design was drafted for.
Fitting notes:
- After you’ve made your muslin, please refer to the pants fitting cheatsheet to help you decide which adjustments to try.
- Use your muslin to determine how much to adjust the pattern. For example, if you can see that you need an extra inch of width in a certain area, you’ll need to add an inch of width when adjusting your pattern.
- Refer to this post on making muslins for further help with this.
- Be sure to make a second muslin (and perhaps more) after you’ve adjusted your pattern.
How to use the fitting diagrams:
- You will want to trace a copy of your pattern. Not a big deal, since this pattern has only a few pieces, and it will save you from ruining your pattern.
- Mark your seamlines on the pattern (5/8″ from the edge). You don’t need to mark it over the whole pattern, but at least mark the seam at the points where the slash lines are. On the diagrams, the seamlines are marked with dashed lines.
- The diagrams show where to cut, spread, and overlap your pattern.
- You’ll notice little circles in some spots, where the slash lines intersect the seam line. This is called a “pivot point.” Don’t slash the pattern all the way to the edge, but instead slash just to where this circle is. Then carefully snip into the seam allowance, forming a little hinge where the circle is. When you adjust your pattern, you’ll be pivoting at this point rather than from the very edge.
- Once you have your pieces adjusted, tape them into place. You can then retrace the pattern piece if you like.
Further help:
I’d love to help you as much as possible, but please realize there are a lot of you and only one of me. Please be sure to help each other out in the forum as much as you can, and check out the fitting section of our Amazon store for further research.
Adjusting for a full belly

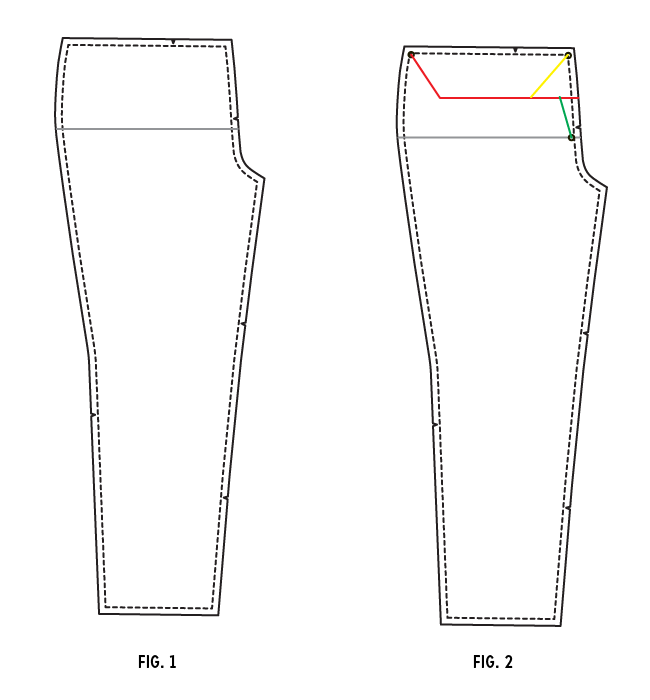
1. Draw in the hip line on your pattern front (the grey line in fig. 1). For this adjustment, you’ll only be working with the front of the pattern.
2. Draw the lines shown in fig. 2.
3. Cut the pattern along these lines. Note the circles, which indicate where you will pivot the pattern. Cut a hinge here in the seam allowance rather than cutting all the way through to the edge (see notes above).

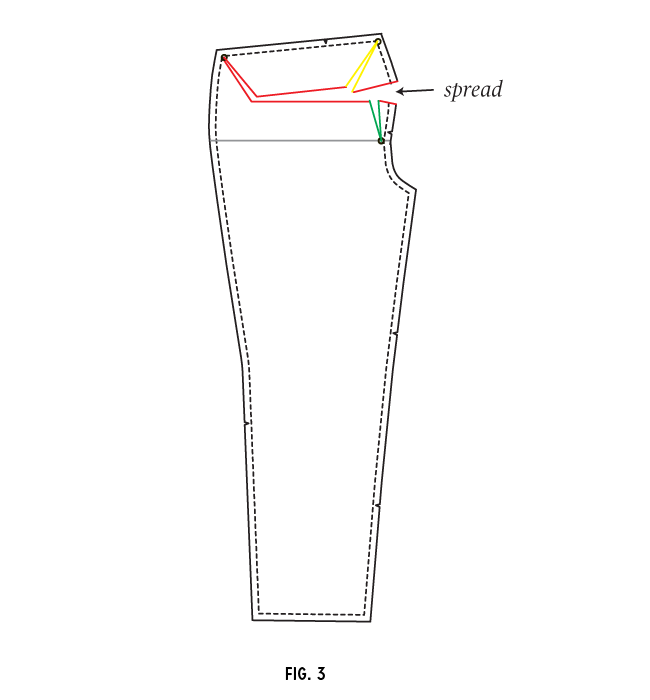
4. Spread the pattern as shown in fig. 3. You are adding both width and length over the belly. Note how the center front seam will now be more curved over the belly.
5. Tape in place, and retrace, smoothing out the curve at the center front.
Adjusting for a flat belly

1. Draw in the hip line on your pattern front (the grey line in fig. 1). For this adjustment, you’ll only be working with the front of the pattern.
2. Draw the lines shown in fig. 2.
3. Cut the pattern along these lines. Note the circles, which indicate where you will pivot the pattern. Cut a hinge here in the seam allowance rather than cutting all the way through to the edge (see notes above).

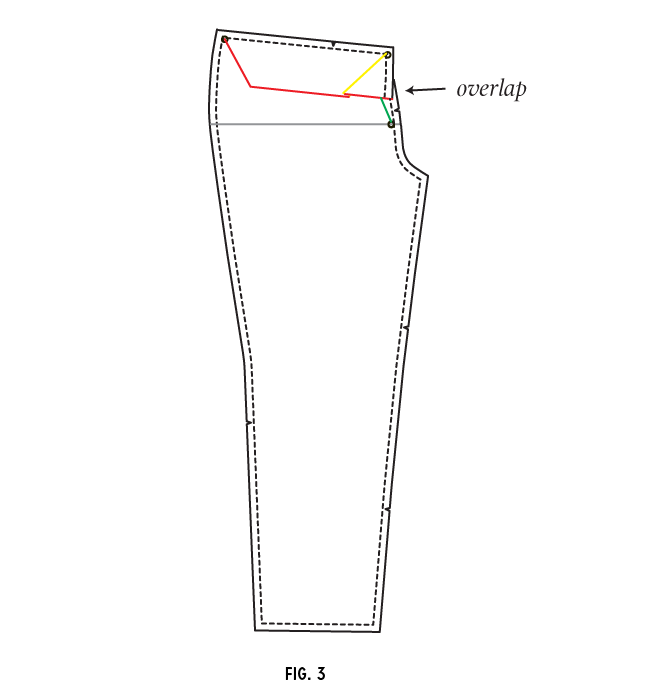
4. Overlap the pattern as shown in fig. 3. You are removing both width and length over the belly. Note how the center front seam will now be less curved over the belly.
5. Tape in place, and retrace, smoothing out the line at the center front.


Comments
This is the best explaination I have yet come across for the ‘belly cut’ to trousers, and I have been through quite a few tailoring books to date!
Thanks, Rosemary!
I can’t even possibly express how grateful I am to you guys for making me a better seamstress! You have an incredible talent for teaching someone like me with little/no formal training in pattern adjustments and making it easy!
Also not really related to Clover but did you notice Nancy Shevell’s wedding dress (Paul McCartney’s new bride)! It reminds me so much of the Ceylon pattern, I <3 fashionable eye candy!
Thanks for posting this! I’ve got two main problem areas, tummy and arms, so hopefully this will eliminate my distress over covering the lower half.
Wow fantastic tut! I love the colour coding, it makes things much simpler to follow.
great tips thanks for your website
Does anyone know if it would skew the new full belly pattern to raise the front rise? I don’t like ready pants because they all dip in the front. I’d much rather have high wasted pants.
Sarai,
I try not to leave too many comments that are basically just “oh yay, you’re awesome!,” but that’s what this one is: your pants fitting adjustment instructions are fantastic — elegantly explained and beautifully illustrated. A treasure to pants-sewers everywhere. Thank you!
Thanks, Emily-Jane! And one can never have too many encouraging comments, especially with something that took this much time! It’s good to know that people are finding it useful.
Thanks so much for this alteration information. With a flat dierriere and full tummy fitting pants has always been a challenge. In all my searching, I have not found this alteration anywhere else.
Fabulous—Finally, a great explanation and especially drawing of tummy
alterations! I appreciate this more than I can express! THANK YOU ALL!
This is how to do it!!! Wish I were needing to use the flat belly adjustment.
Took a look at your directions for flat belly/pot belly corrections. I think your correct is the
Longer than needs to be. In short all you really did was increase or decreased the rises. I agree with the horizontal slashing, but any other slashing is a waste of time. It should be a simple slash, open and blend. I work in the clothing industry as a technical designer with pattern making experience. Not sayimg your wrong, but too many steps. I personally believe the best way to fix the problem is to increase or decease the front width. Thanks for listening.
I think it depends on the problem you are adjusting for. If it is for a full or flat lower belly, increasing the CF curve as well as the rise helps the seam curve over the belly while keeping the waist the same (that’s what’s shown here).
If, however, the waist and belly are simply wider all around, increasing the width would make sense. I do think increasing the rise could still be necessary though (to fit over a bigger curve).
I have been struggling with a pant pattern ,for a couple of days, so after finding your site, I put a couple of your tips in play. Will sew these pants tomorrow. Hope it gives me a better fit. Thanks for all the great fitting suggestions , if they work out for me I will be making more pants, so excited. Thanks
Very helpful!!! TKS
Hello! I am making the Juniper pants and have had great success with the pants fitting cheat sheet in terms of narrowing the legs….but I need to make a flat belly adjustment. I am new to sewing pants and I’m not sure how to work around the fly bits that are attached to the pants front pattern piece on the Juniper – in terms of drawing and cutting the slash lies shown above. I think maybe I should remove the fly bits just to the left of the topstitch line, make the changes and then reattach the fly bits, but I’m not positive?
Yes, that method will definitely work, Janelle!
Many thanks, Sarai xo